
Deploy JupyterLab Latest (Open-Source Interactive Notebook Platform)
JupyterLab [Jul ’26] (Code, Analyze & Visualize Data Easily) Self Host
scipy-notebook
Just deployed
/home/jovyan/work

Deploy and Host Managed JupyterLab Service with one click on Railway
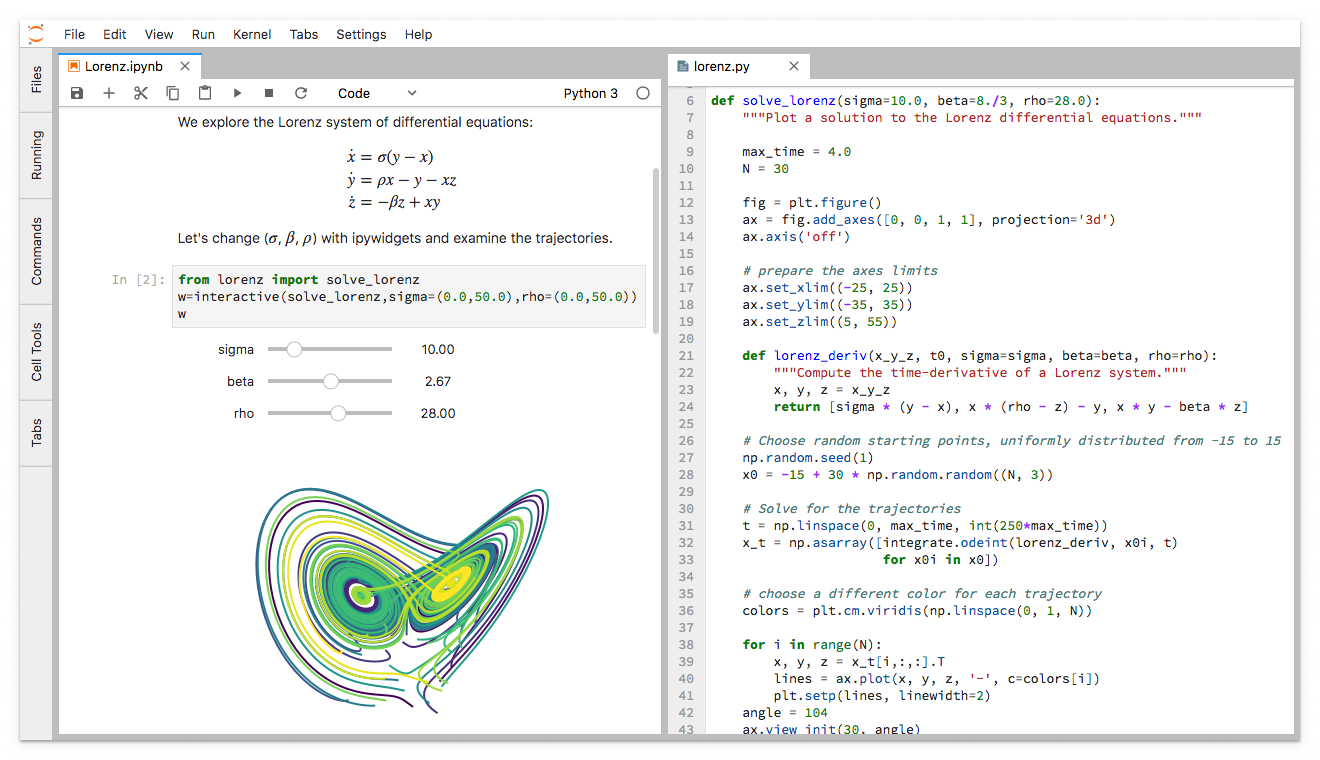
JupyterLab is the next-generation, open-source web-based interactive development environment (IDE) for data science, machine learning, and scientific computing. Built by the Jupyter community, it provides a flexible and powerful interface for creating and sharing documents that combine live code, equations, visualizations, and narrative text.
About Hosting JupyterLab on Railway (Self Hosting JupyterLab on Railway)
Self-hosting JupyterLab on Railway means you get your own, private, cloud-based development environment that runs in your browser. Unlike third-party hosted solutions, you control the infrastructure, configurations, and dependencies, ensuring complete data privacy and customization.
Why Deploy Managed JupyterLab Service on Railway
Deploying a managed JupyterLab service on Railway means you get all the advantages of a powerful Jupyter environment without worrying about maintenance, updates, or infrastructure management.
Railway vs DigitalOcean
While DigitalOcean requires you to configure droplets, install dependencies manually, and handle SSH access, Railwayprovides an instant deploy option. You can launch JupyterLab in seconds, with pre-configured dependencies and seamless scaling - no sysadmin work needed.
Railway vs Linode
Linode expects manual configuration of environments, virtual machine setup, and periodic updates for your JupyterLab environment. Railway, however, automates everything - from deployment to updates - so you can focus purely on coding, analysis, and visualization.
Railway vs Vultr
On Vultr, setting up JupyterLab involves handling firewall settings, disk management, and Python environment setup. Railway eliminates these manual steps, automatically managing your compute, memory, and container security.
Railway vs Hetzner
Hetzner is affordable and powerful, but it demands full server management, updates, and backups. Railway simplifies all of this with one-click deployment and automated maintenance, so you can deploy and manage your JupyterLab workspace effortlessly.

Common Use Cases
Here are some popular use cases for JupyterLab:
-
Data Science & Machine Learning: Run Python notebooks for data analysis, visualization, and training machine learning models.
-
Research & Scientific Computing: Combine equations, code, and output for scientific experiments and simulations.
-
Education & Tutorials: Use interactive notebooks for teaching coding, mathematics, and data visualization.
-
Collaborative Projects: Share live notebooks with teams for real-time collaboration and joint development.
Dependencies for JupyterLab hosted on Railway
To host JupyterLab on Railway, the following components are typically needed:
-
Python Runtime: Required to execute code cells and run Jupyter servers.
-
Notebook Server (Jupyter): The core backend that manages notebooks and kernels.
-
Web Interface (JupyterLab): The frontend interface that users interact with.
-
Persistent Storage: For saving and managing notebooks and project files.
Deployment Dependencies for Managed JupyterLab Service
A managed JupyterLab instance on Railway automatically provisions the following:
-
Python runtime (pre-configured)
-
JupyterLab web server
-
Secure storage volumes for your notebooks
-
Containerized environment for security and scalability
No manual setup or dependency installation is required - just deploy and start coding.
Implementation Details for JupyterLab
When deploying, you may need to configure environment variables such as:
JUPYTER_TOKEN=
JUPYTER_PORT=8888
These allow you to secure your Jupyter environment and define the port for access.
How Does JupyterLab Compare Against Other Notebook Environments?
JupyterLab vs Jupyter Notebook
JupyterLab is the next-generation interface for Project Jupyter. While the classic Jupyter Notebook offers a single-document interface, JupyterLab provides a multi-document, modular workspace - allowing users to open notebooks, terminals, text editors, and data viewers in tabs or split screens.
JupyterLab vs Google Colab
Google Colab is free and cloud-hosted, but your sessions are temporary and tied to Google’s environment. JupyterLab on Railway offers permanent, private environments with full control over packages, versions, and data storage.
JupyterLab vs VS Code Notebooks
VS Code integrates Jupyter support, but it requires local setup or complex remote configurations. JupyterLab on Railway offers an instantly available, browser-based IDE - optimized for notebooks and data workflows.
JupyterLab vs Deepnote
Deepnote adds team collaboration layers but charges for premium features. JupyterLab, being open-source, is completely free to self-host and can be scaled or customized as needed on Railway.
How to Use JupyterLab
Using JupyterLab is simple:
-
Deploy JupyterLab on Railway. Click the deploy button and Railway handles setup.
-
Access the Dashboard. Open your Railway app’s URL to access your private JupyterLab instance.
-
Start a New Notebook. Choose your preferred kernel (Python, R, or Julia).
-
Write and Run Code. Execute cells interactively and visualize data instantly.
-
Save and Share. Store notebooks on Railway’s persistent volumes or download them locally.
How to Self Host JupyterLab on Other VPS
Clone the Repository
Use the official JupyterLab repository:
git clone https://github.com/jupyterlab/jupyterlab.git
Install Dependencies
Make sure your VPS has Python and pip installed. Then, run:
pip install jupyterlab
Configure Environment Variables
Set a password or token for security:
jupyter lab --generate-config
Update the configuration file to include your credentials.
Start the JupyterLab Server
Run:
jupyter lab --ip=0.0.0.0 --port=8888
Access your JupyterLab environment from your browser using your server’s IP and port.
Access the Dashboard
Login with your token and start coding. With Railway, this entire setup is automated - deploy and start coding in one click.
Deploy Now!
Features of JupyterLab
-
Multi-tab Interface: Work with multiple notebooks, terminals, and files in one window.
-
Extensible Plugins: Add themes, code formatters, Git integration, and more.
-
Rich Visualization Support: Supports Matplotlib, Plotly, Bokeh, and Seaborn visualizations.
-
Real-time Collaboration: Share notebooks with colleagues in real time.
-
Kernel Flexibility: Run code in Python, R, Julia, and more.
Official Pricing for JupyterLab Cloud Services
JupyterLab itself is open-source and completely free. However, hosting it on managed cloud platforms incurs infrastructure costs. Railway offers flexible pricing based on usage. A typical JupyterLab deployment costs around $5–$10 USD per monthfor light use, depending on storage and compute needs. For data-heavy workloads or multiple users, upgrading to a higher Railway plan is recommended.
Self Hosting JupyterLab vs Paid Notebook Services
Self Hosting JupyterLab
-
Cost: Free (only pay for Railway resources)
-
Control: Full access to configuration and environment
-
Privacy: 100% data ownership
Paid Notebook Platforms (e.g., Colab Pro, Deepnote, Databricks)
-
Cost: Monthly subscriptions ranging from $10–$99+
-
Control: Limited customization
-
Storage: Restricted or temporary sessions
System Requirements for Hosting JupyterLab
Minimum recommended setup:
-
CPU: 1 core or higher
-
RAM: 2 GB minimum (4 GB recommended)
-
Storage: 2 GB free disk space
-
Python Version: 3.8 or above
FAQs
What is JupyterLab?
JupyterLab is an open-source, web-based IDE for interactive coding and data analysis, built as the successor to Jupyter Notebook.
How do I self host JupyterLab?
You can deploy JupyterLab manually using Python or in one click using Railway for a fully managed setup.
How do I deploy JupyterLab on Railway?
Click the “Deploy Now” button on the Railway JupyterLab template page. Railway will automatically set up your runtime, environment variables, and storage.
What dependencies are required for JupyterLab hosting?
Python runtime, JupyterLab server, and persistent storage are essential for hosting.
What are the common use cases for JupyterLab?
Data analysis, machine learning, education, research, and code prototyping.
How does JupyterLab deployment on Railway compare to other VPS?
Railway offers automation, scalability, and simplicity - no manual configuration or server maintenance required.
Is JupyterLab free?
Yes. JupyterLab is open-source and free to use. You only pay for hosting costs on platforms like Railway.
How much does it cost to host JupyterLab on Railway?
Typically between $5–$10/month, depending on usage and resources.
Template Content
scipy-notebook
quay.io/jupyter/scipy-notebook